Checkout step 3 — UPI / payment screenshot
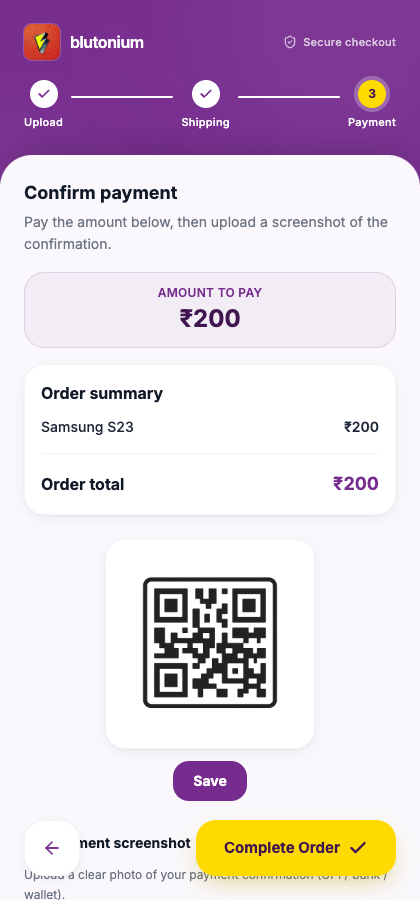
Step indicator label: Payment. Heading: Confirm payment — Pay the amount below, then upload a screenshot of the confirmation.
Shared customer links collect a payment screenshot (UPI / bank / wallet). Card gateways like Razorpay on the ecommerce store are a different flow.
Customer
- Check Amount to pay and the Order summary.
- If a QR is configured for that POS, scan Payment QR Code. Optional Save / Saving… downloads the QR image.
- Under Payment screenshot, upload a clear confirmation photo (
image/*). Hint: Upload a clear photo of your payment confirmation (UPI / bank / wallet). Drop-zone label: Upload payment screenshot (JPG, PNG up to 10MB). - Wait for Uploading screenshot..., then Screenshot uploaded (toast: Payment screenshot uploaded successfully). Use Change to replace it.
- Tap Complete Order.
You must upload a screenshot first; otherwise: Please upload payment screenshot.
After a successful step 3 submit, you briefly see Order placed! / Redirecting to order details..., then the success screen. The link status becomes Submitted for staff.
Staff
- In POS Settings, configure the store UPI QR used by customer-link checkout (Verify in UI for the exact settings tab).
- After submit, open the Submitted card and check Payment Screenshot before Add to Orders.
- Completing the POS order with that link moves status to Order Placed — Convert to order.
Related
- Technical: Payments — POS & links — UPI screenshot flow (no Razorpay)
- Technical: Checkout internals